Make a tall, pointy witch’s hat with simple supplies you already have at home. This beginner-friendly tutorial covers the cone, brim, and finishing touches—plus kid-safe tips and decorating ideas.
Time: 25–40 mins Skill: Easy Ages: 6+ with supervision
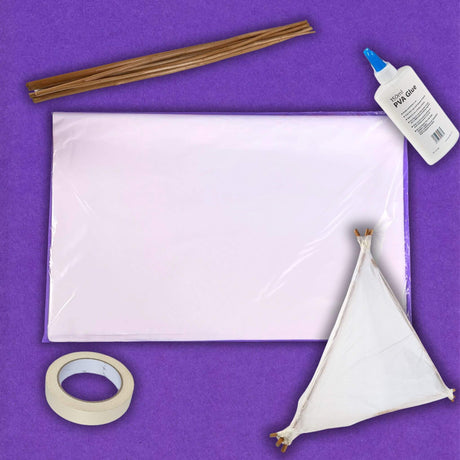
You’ll Need
- Black construction paper or cardstock (A3 or larger makes a taller hat)
- Scissors
- Pencil & ruler
- Glue (PVA or glue stick). Try: PVA Medium Glue
- Compass (or trace a large bowl/plate)
- Optional accessories: ribbon, jewels, glitter, felt shapes
Step-by-Step Instructions
Step 1 — Draw & Roll the Cone
- On black paper, draw a large quarter-circle using a compass. No compass? Trace a big round object and cut a quarter from it.
- Cut out the quarter-circle and roll it into a tall, pointy cone. Adjust the overlap until the point is sharp.
- Glue along the overlapping edge. Hold or clip for 1–2 minutes until secure. (Optional: reinforce the inside seam with a short strip of masking tape.)

Step 2 — Fringe the Base
- Along the bottom edge of the cone, snip 2–2.5 cm (≈1") slits all the way around to create tabs.
- Fold each tab outward—this makes a flat “ledge” for attaching the brim later.

Step 3 — Measure for the Brim
- Stand the cone on scrap paper and trace around it to capture the cone’s inner diameter (the hole size).
- On fresh black paper, draw two concentric circles: the inner equals your traced size; the outer is your desired brim width.

Step 4 — Cut & Attach the Brim
- Cut out the donut-shaped brim (outer circle first, then the inner circle).
- Slide the brim over the cone from the top down until it rests on the outward tabs.
- Glue the tabs to the underside of the brim, pressing firmly for a neat join. Let dry fully.

Step 5 — Finish & Decorate
- Even the brim edge with scissors if needed for a smooth circle.
- Add a band of ribbon, a jewel brooch, stars, or glitter. For extra drama, cut a second, wider brim and layer it beneath.

Pro Tips: If your paper is thin, double-layer the cone for sturdiness. Want a floppy hat? Use one layer for the cone but two layers for the brim with a slightly larger diameter.
Troubleshooting
| Issue | Fix |
|---|---|
| Cone won’t hold shape | Increase overlap before gluing; reinforce inside seam with a short strip of masking tape. |
| Brim wobbles | Ensure tabs are folded flat and fully glued; add a second “support” ring under the brim. |
| Point is blunt | Trim a narrower wedge from the quarter-circle and re-roll for a sharper tip. |
Keep Crafting
Learn 5 Creative Ways to Use Wet Strength Tissue Paper
New to wet strength tissue? Start with What is Wet Strength Tissue Paper?
Featured Products


Acrylic Jewels & Gemstones – 454g Mixed Pack
£1299 GBP
Unit price
/
Unavailable


Sold out
From
£617 GBP
Unit price
/
Unavailable